


Table of Contents
The Airport map in Arena Breakout: Infinite is not just another large location – it is one of the most intelligently designed, loot-dense, and survivable maps of Season 4. If you understand its logic, you can farm Koens consistently without being forced into constant PvP chaos.
This guide breaks the Airport down to its core mechanics: spawns, routes, safes, keys, loot logic, and optimal playstyles – so you play with your brain, not luck.
Why Airport Is One of the Best Maps This Season
Airport succeeds where many large maps fail:
- No empty running zones
- No forced PvP funnels
- High loot density across the entire map
- The highest number of safes in the game
- Multiple viable playstyles: aggressive or stealthy
If you want fights – you’ll find them.
If you want stable Koen farming – the map allows it.
This balance is what makes the Airport map unique.
Airport Map Logic: Why Survival Is Easier Here
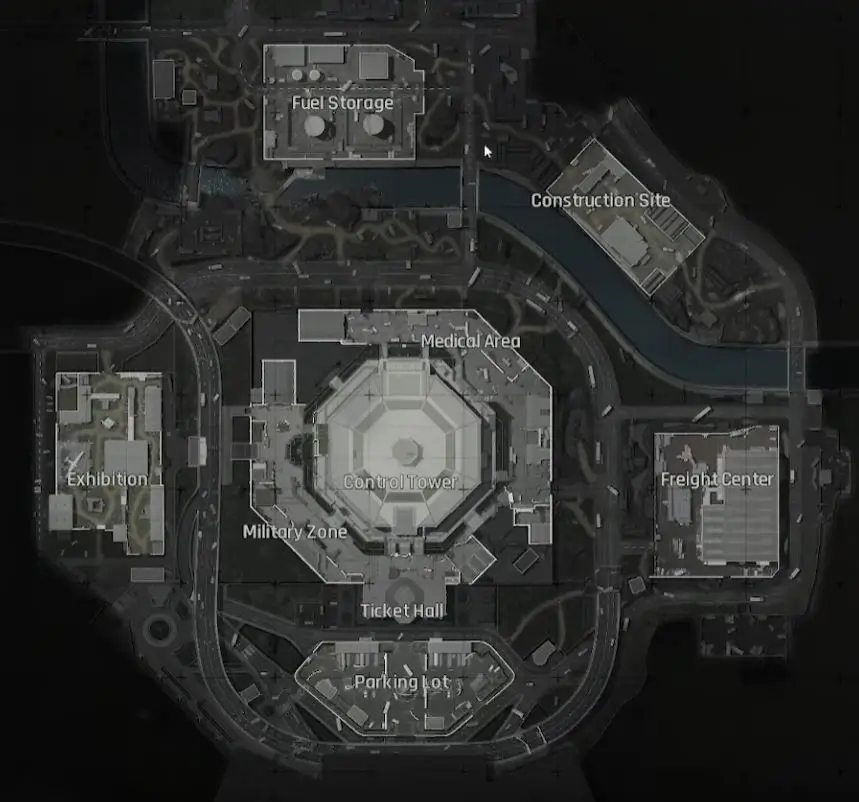
The airport is a ring-shaped map with a dense central core.
Core Structure
- Center: Control Tower (2 floors, main PvP hotspot)
- Outer Ring: Five major locations
- Connectors: Corridors, bypasses, flanking routes
This means:
- Not everyone rushes the center
- You can rotate safely
- You choose when to fight
Your survival rate depends entirely on route selection, not RNG.
All Spawns & Early Contact Timings
After extensive testing, Airport has 11 primary spawn points:
- Exhibition Area: 3 spawns
- Fuel Depot: 2 spawns
- Construction Site: 2 spawns
- Cargo Center: 2 spawns
- Parking Area: 2 spawns
Important Reality Check
- Not all spawns activate each raid
- Average lobby size: ~12 players (4 squads total)
- Early spawn fights are rare, unless you sprint directly into a hotspot
Airport respects minimum engagement distance, unlike smaller maps.
Outer Ring Locations Overview
The outer ring consists of five loot-rich zones. Each is viable for farming.
1. Exhibition Area
One of the most valuable zones outside the tower.
- Exclusive airplane collectible quest
- Collect 4 model planes → guaranteed high-tier loot
- Each squad member receives rewards individually
- Free electronic safe always present
- Key room inside a service cabin
Perfect for solo and squad farming.
2. Fuel Depot
Compact but efficient.
- One guaranteed free safe between fuel tanks
- Locked room (Fuel Depot Key):
- Electronic safe
- Additional containers
High reward, moderate risk.
3. Construction Site
The most unpredictable zone.
- Free safe may disappear between raids
- Only the outer-ring location where this happens
- Multiple mini-safes
- Drainpipe extraction (no-backpack exit)
Always check the map after spawning.
4. Cargo Center
Consistent and safe farming zone.
- Guaranteed free electronic safe in hangars
- Locked storage room (Cargo Area Key):
- Safe
- Multiple crates
Low traffic, reliable income.
5. Parking & Ticket Hall
Strong transitional area.
Parking
- Electronic safe inside a vehicle (20-second timer)
Ticket Hall
- Fast access toward center
- Second floor locked room:
- Safe
- Document box
- Military PC
High movement traffic – loot fast and rotate.
Safe System Explained (Critical Knowledge)
The airport has the most safes in Arena Breakout: Infinite.
Safe Types
- Free safes: 12 total
- Locked safes: 8 total
- Mini-safes: Dynamic spawns (not marked)
Key Rule
The map always contains 8 free safes – they never disappear, only relocate.
Mini-safes:
- Not marked on map
- Change position each raid
- Spawn in logical places (tables, desks, corners)
- Drop gold frequently, and can drop red items
Ignoring mini-safes is a mistake.
Airport Safe Table
| Location | Safe Type | Risk | Average Value |
|---|---|---|---|
| Parking Lot (Car) | Electronic Safe | Low | 80k–150k |
| Exhibition Main Building | Electronic Safe | Medium | 100k–200k |
| Fuel Depot (Between Tanks) | Electronic Safe | Medium | 120k–220k |
| Cargo Center (Hangar) | Electronic Safe | Medium | 100k–180k |
| Control Tower – Fountain | Electronic Safe | High | 150k–300k |
| Control Tower – AOK Control | Electronic Safe | High | 150k–300k |
| Control Tower – AOK Archives (Code) | Electronic Safe | Very High | 250k–500k |
Central Zone: Control Tower Breakdown
The Control Tower is the highest-risk, highest-reward area.
Free Safes (4)
- Fountain (1st floor)
- AOC Control Center (1st floor)
- AOC Archives (requires password)
- Near elevator (2nd floor, variable position)
Paid / Semi-Free Rooms
- Staff Rest Rooms (can be kicked open)
- Management Lounge (key required)
- VIP Reception (pass-through room)
- AOC Archives (key + password puzzle)
AOC Archive Puzzle (Mini-Quest)
- Find yellow AOC books around the tower
- Each book maps letters to numbers
- You only need 2 correct symbols
- Brute-force the third
Best done with a teammate, splitting floors.
Reward:
- Free safe
- Locked archive room:
- Electronic safe
- Standard safe
- High-tier loot
This is one of the best loot interactions in the game.
Farming Strategies by Playstyle
Aggressive Playstyle
- Rush Control Tower
- Activate levers
- Control entrances
- Extract via elevator
High risk, very high profit.
Stealth / Solo Farming (Recommended)
- Avoid center early
- Rotate outer ring
- Loot mini-safes and side rooms
- Stretch raid timings
- Extract quietly
This is the most consistent Koen strategy.
Keyed Rooms (ROI Ranking)
| Key Name | Location | Safes | ROI Verdict |
|---|---|---|---|
| Executive Lounge Key | Control Tower (2F) | 1 Safe | ✅ HIGH |
| VIP Reception Key | Control Tower (2F) | 1 Safe + Docs | ✅ HIGH |
| AOK Archives Key | Control Tower | 2 Safes | 🔥 TOP TIER |
| Ticket Hall Key | Ticket Hall (2F) | 1 Safe | ⚠️ Medium |
| Fuel Depot Key | Fuel Warehouse | 1 Safe | ⚠️ Medium |
| Cargo Zone Key | Cargo Center | 1 Safe | ⚠️ Medium |
| Management Area Key | Central Hangars | Mini-safes only | ❌ LOW |
All Extraction Options
Main Extractions
- Elevator (2 levers, ~90s on red difficulty)
- Helicopter (2 tokens)
- Co-op exit (voice chat enabled)
Additional
- No-backpack exits
- Standard edge extractions
All extraction points and conditions are clearly marked on the map.
Pros & Cons of Airport Map
Pros
- Highest safe count in the game;
- Loot is rarely empty;
- Multiple viable routes;
- New mechanics & puzzles;
- No forced PvP.
Cons
- Raid time is only 35 minutes.
- Slightly complex for new players.
A 40-45 minute timer would make this map perfect.
Airport FAQs
Yes, Airport is one of the best Koen-farming maps due to its high concentration of safes, key rooms, and valuable loose loot. With the right route, Airport consistently outperforms most standard maps in profit per raid.
Yes, mini-safes can drop red-tier items, but the chance is low. Main safes and key rooms have a significantly higher red-item drop rate.
High-value office and archive-related keys are typically the most profitable, especially those that open rooms with guaranteed safe spawns.
Yes. Solving the AOK Archives code can unlock one of the highest-value loot rooms on Airport, making it absolutely worth the effort if uncontested.
For raw loot value and Koen farming, Airport is generally better. Armory offers intense PvP and gear drops, while Airport excels at valuables and safes.
Yes, but it’s high-risk. Co-op exits require trust and timing, and betrayals are common on Airport due to high loot stakes.
Yes, but the chance is extremely low. Safes and key rooms are far more reliable for red items.
Not really. Airport is high-risk, high-reward, and better suited for experienced players who understand routes, timing, and PvP flow.
Final Verdict: Why Airport Is a Koen Farming Goldmine
Airport is a looter’s map, not a meat grinder.
- Even if you arrive late, loot remains
- Safes are rarely empty
- Routes adapt dynamically
- Risk is always optional
If you learn this map properly, the Airport becomes one of the most profitable and enjoyable maps in Arena Breakout: Infinite.